

Lillie is the Keeper 1.4 is now available for iPhone & iPad!
App Store (iPhone & iPad)

Cinematic/tech artist & filmmaker. Online since 1999.
Lillie is the Keeper 1.4 is now available for iPhone & iPad!
App Store (iPhone & iPad)
Each level of “Lillie is the Keeper” features a unique high-definition skybox texture. These Unity cubemaps are rendered in Bforartists, the UI-focused fork of Blender. Here’s how you can create your own.
Create a new scene in Bforartists, and switch the Render Engine to Cycles (camera icon: Render Engine). Add a single Directional Light, to act as the sun. Model a gently curving lenticular piece of geometry, about 5 km in radius, to act as the ground/ocean, and texture it appropriately.
If you’re interested in accuracy, you can enable an add-on called Sun Position to set your sun angle for the date, time, latitude and longitude of your game scene (Preferences menu: Add-ons: Lighting: Sun Position).
Switch to the Shading tab, and select the World (background) shader. Create a Sky Texture node. Set it to Preetham, and link its output to the World Output node’s Surface input.

Next, model your clouds (as ordinary geometry) in rough form. Hide them from rendering. Create a Volume object (Add menu: Volume: Empty). Go to the Volume’s Modifiers tab (wrench icon), and add a Mesh to Volume modifier. Set the Modifier’s Object to your hidden cloud geometry object. What you’ll get is a Minecraft-like blocky cloud. Increase the Voxel Amount to reduce this blockiness somewhat–try 1024.

To fully remove the blockiness and get cloudier edges, go back to the Modifiers tab, and add a Volume Displace modifier. Go to the Texture tab (checkerboard icon). Create a new texture, and set its type to Clouds. Go back to your Modifiers, and assign the cloud texture to your Volume Displace modifier. Adjust the Texture and Modifier settings until you like the results.

Go to the Material tab (crash test dummy head icon), create a new material, and assign it the Principled Volume shader. Adjust the material properties to your desired cloud appearance. (This can take a while. Start with a Density of .001-.005. You’re welcome.)
Finally, set up your camera to render the six faces of the cubemap. In the Data tab (camera icon) set the Field of View to 90 degrees. In the Output tab (printer icon) set the Resolution to a power-of-two square, like 1024 or 2048. Set the Frame Range to 0-5. Select a folder and filename to render to, setting the File Format to OpenEXR (.exr), in order to save HDR color values. Go to the Animation tab, and animate your camera to be rotated as follows on frames 0-5 (x,y,z):
Render all six frames (Render menu: Render Animation). This would be a good time to take a walk around the block. Notice the blackbirds.
When you get the renders looking how you want, open your frames in an image editor and arrange them in one big vertical strip. Frame 0 should be at the top, and 5 at the bottom. Save this, again, as an OpenEXR file.
In Unity, import the strip image. Click on the texture to see its Import Settings in the Inspector. Set the Texture Type to Default, the Texture Shape to Cube, and check Fixup Edge Seams.
Finally, create a material. Set the Shader to Skybox/Cubemap, and under Cubemap (HDR), select your texture. In your Scene, open the Lighting panel (Window menu: Rendering: Lighting). Click the Environment tab, and assign your material to Skybox Material.
Download my .blend file for LitK level 5: Light right here.
New in this BIG update:
And to celebrate 1 year on the App Store, LitK is on sale this weekend through January 15.
A frosty Christmas eve
     When the stars were shining
Fared I forth alone,
     Where westward falls the hill
And from many a village
     In the water'd valley,
Distant music reached me
     Peals of bells a'ringing
The constellated sounds,
     Ran sprinkling on earth's floor
As the dark vault above,
     With stars was spangled o'er.

-Robert Seymour Bridges
"Noël: Christmas Eve 1913"

Only once, in all that I’ve spent away from home, have I heard church bells ringing over a town on the night of Christmas Eve. It was in Denmark, and I had been deposited at a stop on the main road. A small village snaked through the dark fields below me, from which rose those clear bells. I was to be the guest of strangers, as often before. It couldn’t have been late. Night comes early there, even in the low north.
Ironically, the acquaintance I was to meet had been made at the height of summer. I recall sitting with three men, pleasantly drunk, not at all following a hushed conversation in Danish, or perhaps dialect. The one English speaker remembered my name well enough: “Geoff with a Gee!” I don’t remember his, having scratched it down only as “J.” It was near 11, but the orange sun hung sluggishly above the horizon, shining through the trunks of a distant copse of trees to inflame the cigarette-stained window of the ancient pub. At some point, I’d mentioned the possibility (then remote) of finding myself that way again at Christmas. My acquaintance had invited me along, in more and fewer words, should the case arise. The men before me were all shadows.
The Meeting House was the second I’d passed, meandering down into the village. As befitting the local agriculture, the new heir to the title had been, effectively, a human pig shed: a low, metal-roofed concrete slab, full of white plastic chairs. The old Meeting House was in every way a contrast. It wasn’t large, but rose to two storeys, with masonry arches above the well-framed windows, and a steep tiled roof. Though also built of greying brick, its age versus the surrounding houses and their large flat expanses was evident at a glance.
A mailbox and wet path up the front yard suggested that the sturdy little building had been subdivided into at least one pensioner’s apartment, but I confess I saw no evidence of this later, and the path may well have led somewhere around behind. Within the privacy glass and drawn blind shone a handful of christmas lights, red and yellow. Someone moved within, momentarily interrupting the pleasant glow. I’ve always been struck by these momentary winter night glimpses into the private lives of others.
But no. The yellow lights were the trick of an approaching car’s headlights. The red were from another that had just passed. The whole effect, including the glow inside, was a confusion of the frosted glass and vinyl blind. The pensioner’s apartment was quite empty, Herr Something-or-other having no doubt gone to his child’s house for the holiday. The other, larger section, showed no signs of life whatsoever.
I continued past the old Meeting House into the village proper: A cluster of houses, garages, a grocery kiosk, and a stone church in the distance. Nothing more. Before the shut-up kiosk, I found my acquaintance with two other men. We were to return up the hill to the Meeting House. He recognized me (“Geoff with a G!”) but I confess I didn’t recognize him. Perhaps he’d shaved his beard, or I was confusing him with another of the drinkers.
Imagine my pleasure when, long before reaching the pig shed, we turned up the damp walkway to the old Meeting House. A rap at the door revealed a clamorous party inside, athough it couldn’t have been 20 minutes since I’d previously passed.
There were candles, though I don’t think they provided all the light. Food covered more than one table. (Rye bread, fish, pickled vegetables, and other things the Danes somehow thrive on.) And of course there was “snaps” in abundance–home infused flavored vodka.
All ages were in attendance, from an old man evincing neither sight nor hearing, to a small baby. The old man sat on a bench by the window, lost in a private rapture. The baby alternately slept and eyed me greyly.
An upright bass was passed my way, dusty but in tune, in contrast to a fiddle which, on striking up, seemed to have degenerated through out-of-tune into something entirely novel. I can’t recall even mentioning I’d played once. The music reared to life, and soon it was all I could do to keep up with the chords of the unfamiliar tunes. The fiddler, for all his instrument’s deathless vigor, appeared himself three-quarters in the grave, sunken eyes aged terribly beyond years less than mine. Another man drummed, white haired despite a youthful face. In my concentration, I was surprised to notice that a game had begun.
At the center stood a tallish man in an unadorned dark cloak, with horns of some kind on his head, masked into apparent blindness–some parish Mari Lwyd type figure. The children ran and danced around him, trying to evade his arms as he turned dizzily, sweeping forth but making little attempt to actually catch them.
A pigtailed young girl grinned at me as she capered past. Struggling as I was with finger memory, it’s likely that it wasn’t her very next pass when I saw her again, but it seemed no time. The eyes I met belonged to an entirely different child. Hard eyes that had never known trust gazed in accusation–not at me personally, but against the very world. The next pass, she was her previous gleeful self. Children are fickle. To this day I’m not certain whether it were twins or the same girl. I can reconcile neither option.
My doubts regarding the blindness of the Mari Lwyd-man were enhanced by his frequent snatches at a particular girl, older than the rest, but wild and ingenuous in the midst of the game. I could presume her age exactly, in fact, by the white Confirmation dress she wore. Fourteen is the age of Confirmation there, and while I take it the pretty ensemble is meant to be rather special, I’ve never thought much of the notion that a dress should only be worn to one celebration.
The game ended, and I needed a rest and a toilet. I gathered that there were no indoor facilites for this (or at least none usable) and was waved out to the pleasantly chilly back yard. The stars had gone, though a glow suffused the clouds. At the fence, the fellow in the antlers had apparently gone on the same errand. He still wore his mask. After all these years, I’ve never figured out what kind of antlers or horns he wore–reindeer I thought, but books show me otherwise. I couldn’t tell (and didn’t want to precisely look) but he seemed continually to be facing away, though we stood at the same fence. Equally, I couldn’t even say whether he was at his business. I’m only certain he didn’t return my vague grunt of greeting. He was still there when I left. Sometimes it takes a while.
The remainder of the evening I can tell you nothing about. Not until the end–or the end for me. Maybe the end for much more.
I found myself sat on a bench against one wall. A woman, much older than me then (and indeed now), handsome but not kindly, sat grandly to my right, in a chair that could have been borrowed from Hamlet. What she was speaking about, I couldn’t tell you. Everything was subtext, and innuendo. She thought she was tempting me. In a way she was: Her imperiousness was draining. I had only so much energy. Of details about her, I remember nothing but a scarf. It draped around her, bright red in a way that should have been festive, but instead evoked crushed berries and blood. She wore it not as a shawl, but wound around her like a snake.
To my other side perched the Confirmation girl in her pressed whites. She’d somehow, in the chaos of the party, gained a crown of winter greens from one of the tables. If during the game she’d slipped down one side of adolescence, she was now insistently trying to climb the other, competing for my attention. I felt her take my arm once or twice, but in truth I was miles away.
My task, the one task I could set what remained of me to, was to count and re-count the people in the room. No count ever agreed with the former. Surely twelve people couldn’t fill even such a modest Meeting House, but each time I tallied something near that. Then it occured to me. The deaths-head and his grey drummer were playing as wildly as before, but there was no music. Light suffused each table, but not a single candle remained lit. The old man sat by himself still, blissful in his insensibility. Everyone was silent, still, heads drooping into shadows. The old man turned toward me.
It was the sharp dig of a fingernail into the skin of either arm that jolted me wildly to my feet. The old woman and the girl both clutched at me. I shrugged away, not daring to face them. The Mari Lwydman was at the back door. He was at the window. He was beside the old man. As I stumbled for the door, he was outside both windows, looking in. Others crowded behind him, craning their blindfolded heads. A touch at my back, and an antler came into the corner of my sight.
My hand reached the doorhandle.
Suddenly, I was on the road. It had begun to drizzle. The weather had turned much colder, and the pavement was icing over. The slick asphalt was blacker than darkness. I slid as much as ran along the void of a road out of that village, aware that I could be in serious trouble if a car came on a blind turn, or I went down and couldn’t get up. No one would even know why I’d been there, save a terse entry in my book with an address for a shuttered kiosk.
Houses, some with one or two windows lit, bobbed slowly past as I struggled to keep my feet. An infinite gulf of sadness stood between us, these people I’d never know nor even glimpse again, behind their lighted windows in the depth of a winter’s night. In one house rambled an indistinct man who could have been my aquaintance. Two more men were visible in the subsequent houses. In the fourth, at a table, sat the old man–the very same old man–listening perhaps to the radio, or else bent to the revelations in his own silent ears.
Pink lights suggested a baby’s room, at the end of an old farmhouse, with a blanketted bundle in a crib. A worm-eaten man paced by the window of the next house. A white head brushed his teeth, preparing for bed, in the subsequent. A tall shadow with antlers stood in the lighted glass door of the next, and I ceased looking about. The houses could consume their occupants.
Somehow, eyes down and thoroughly exhausted, I found my way to a bus later in the night, in what would have been morning elsewhere. I rode out of that place, and indeed out of the country. It was a long time before I returned.
The first came to say you were loved once
The second to say you never were
The third came to say you were loved, only once
The fourth came to break your heart
The fifth was like looking at the sun
The sixth was a tatter, hanging from a chimney in the fog
The seventh lurks outside every now
The eighth knew what you really were
Nina was disloyal
The tenth you failed, and others
The eleventh is a life and death’s secret
The twelfth is a winter night’s stars
A work conversation sparked these. Then I just got curious.
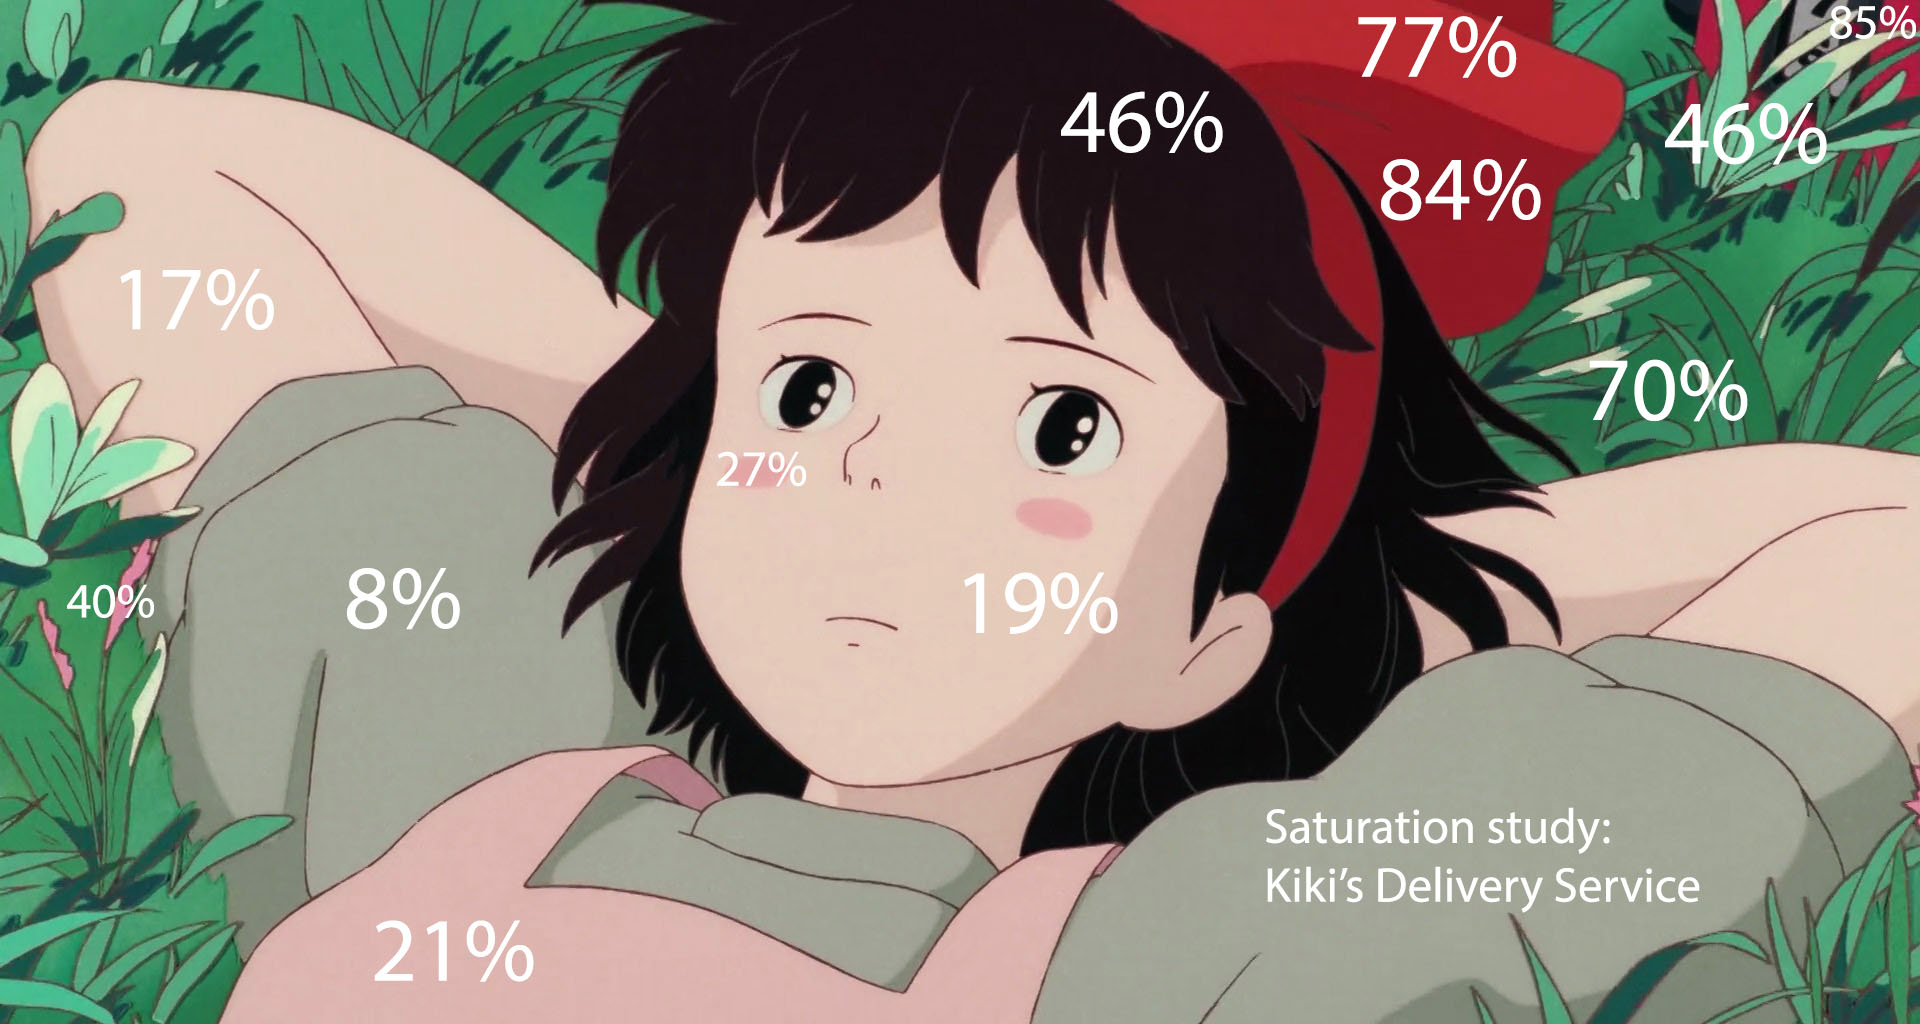
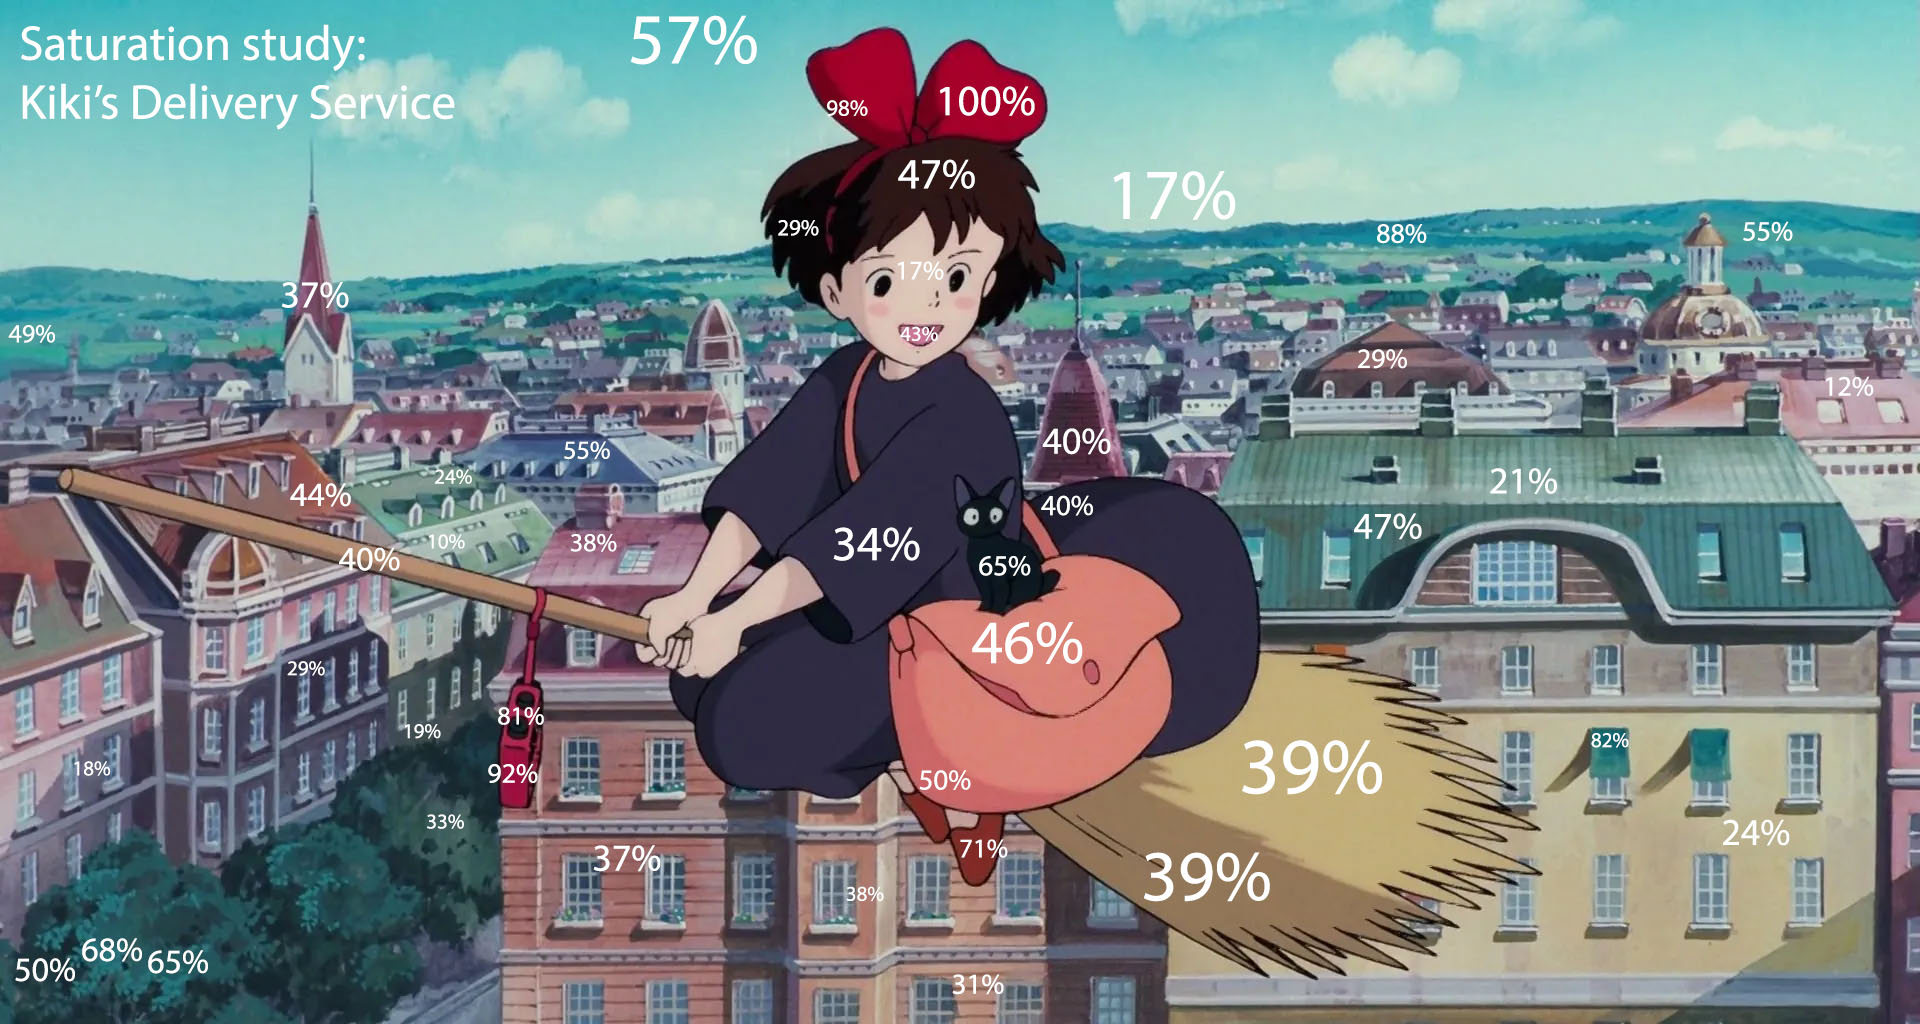
Studio Ghibli’s movies are always described as “colorful” but it’s interesting what that really means. Like with a lot of things, less is so often more.

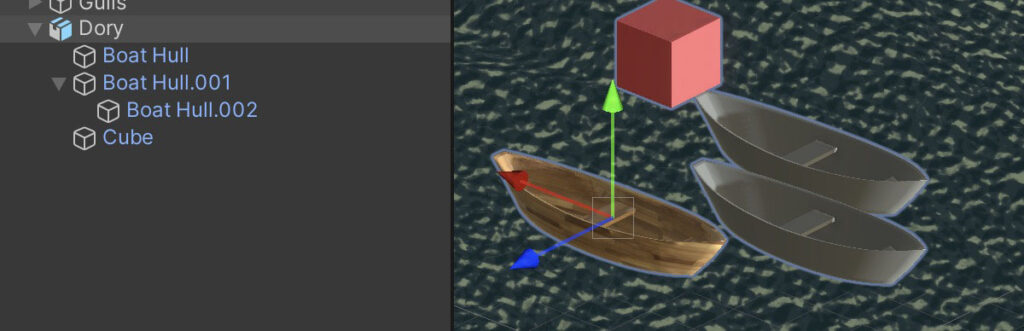
There’s a bug in the FBX exporter for Blender 3.x (and now 4.x) that doesn’t export materials on instanced meshes. While the original mesh imports into Unity just fine (and remaps materials correctly under the importer’s Materials tab) duplicate instances of the same mesh import with only the default Lit material. If you’re (perhaps oldschool) like me, and use a lot of instancing to save disk space, this is a problem.
Here’s a Unity Editor script to fix things: FBXFixerScripts.zip
It supports Undo, regular and skinned meshes, and will walk down the hierarchy as far as it needs to. Can take a few seconds to grind through big hierarchies. Works on my ultra-complex Lighthouse prefab, and all the others I’ve thus far thrown at it. If you find a bug, let me know!
Here’s how to use it:

We found our audience. Troy Minkowsky’s “The Garden (1910)” was requested for this year’s Shawna Shea, and took home Best Experimental Short! Audience feedback was across the board praise for Troy’s touching, funny and challenging retelling of the Adam and Eve myth.

I was DP and Co-Producer on this 30 minute film, shooting on a pair of iPhones and producing the digital+practical special effects. It was an enormous but fun challenge, working out first how a magician from the early 20th Century would have accomplished the shot, then how I’d fake it–with a mix of puppets, green screen, miniatures, CGI and composites. We simulated manually cranked film with hand coloring in Blackmagic Fusion. It was film nerd heaven.
Big congratulations also go out to Miriam Olken, who took home a Spirit Award for her screenplay “Jaw” the same night. Olken served as my Assistant Director on “The Leaves.” It’s fantastic to see someone so talented getting real recognition.
If you haven’t seen the film yet, it’s available on Vimeo. (Free login required, due to non-sexual nudity.) And yeah, that was me at far right–God’s only angel with a goatee.
Download the .blend file here.
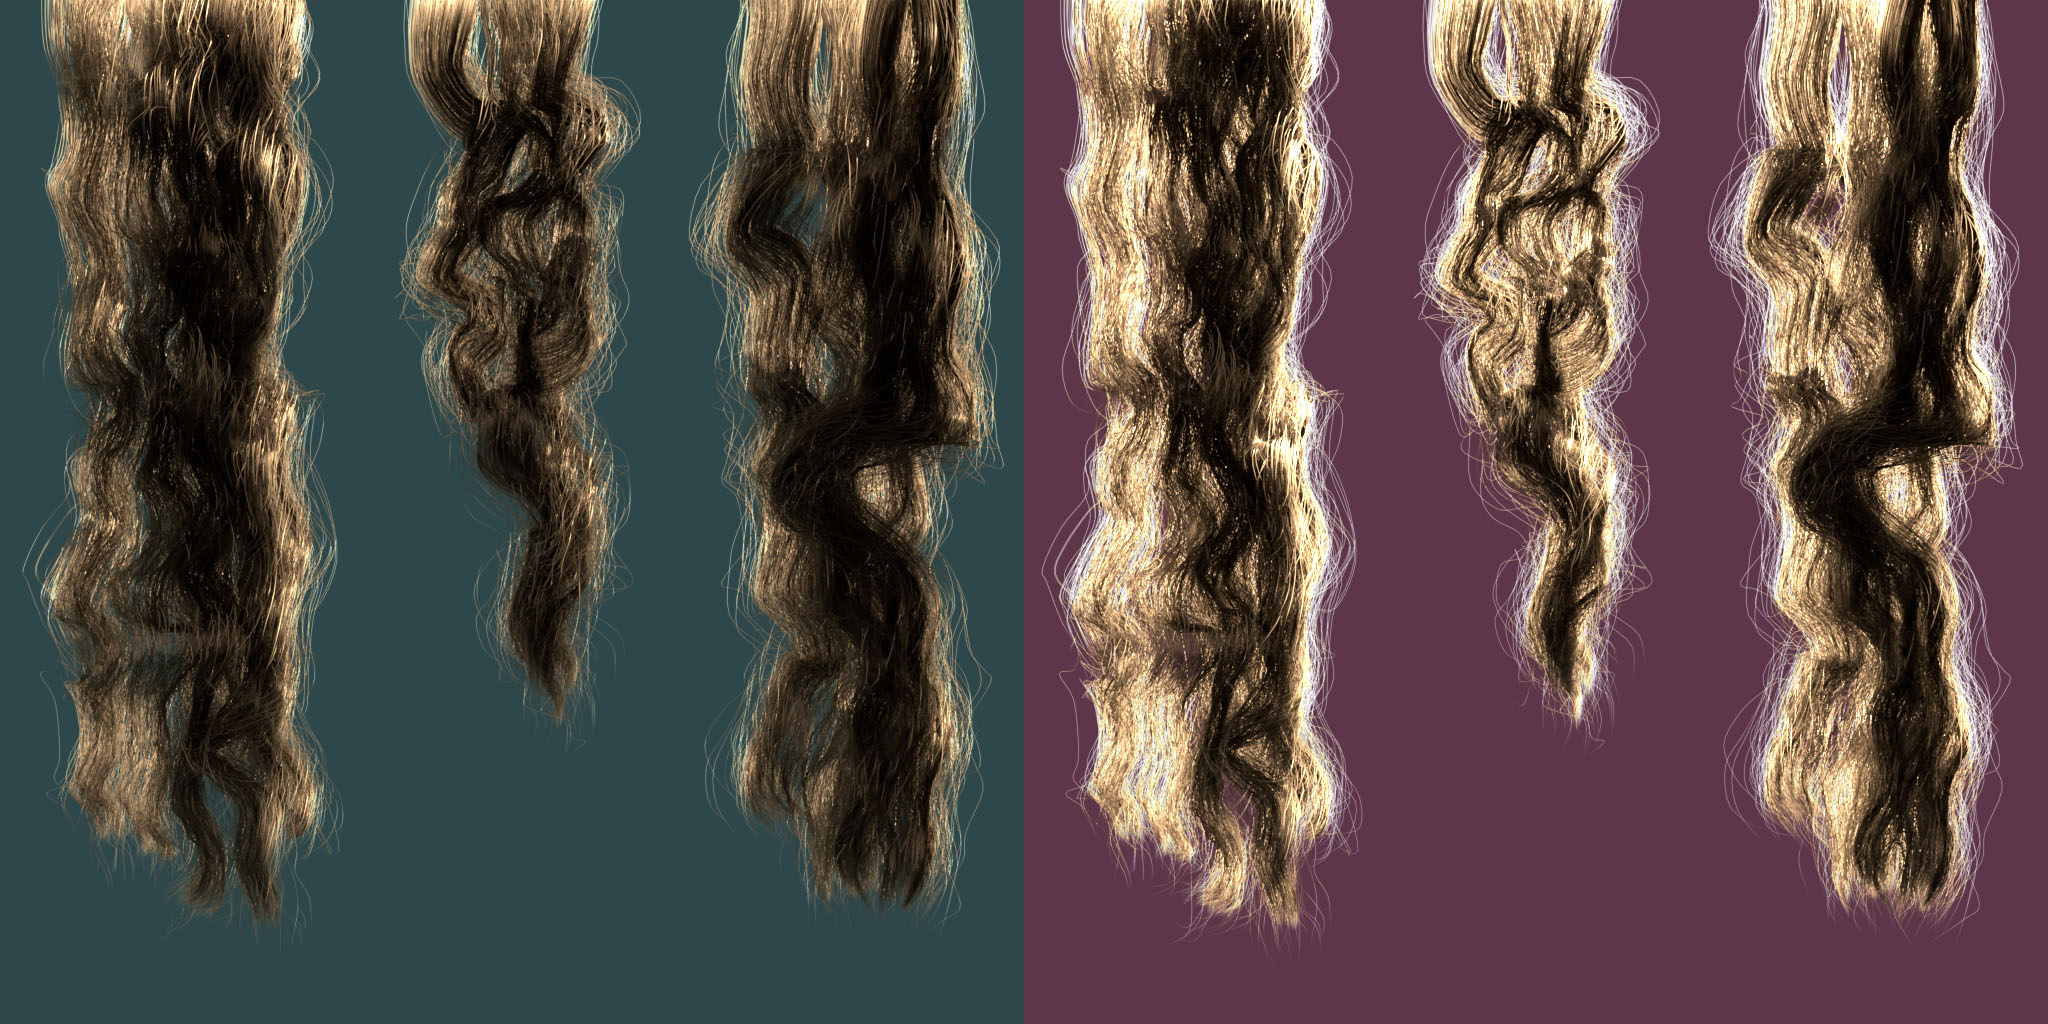
In LitK, Lillie’s messy hair becomes visible when you don’t have look-around control. (I’m bored with letterboxed cutscenes.) The original hair textures were hand-painted, before “rounded realism” really took shape. There’s a realtime hair package in Unity, but it’s heavy for iOS devices. I decided to try rendering out some more realistic textures in BForArtists (Blender).
How does a gen-x-lennial go about learning a new tool? Try to find the one non-video tutorial Google still indexes. Skim it. Dive in. Check the documentation. Get something you’re reasonably happy with. Junk it, and start over from scratch. Get something maybe actually useable. Tweak it until you run out of time.
The results aren’t bad:
Then, defocused in Photoshop:
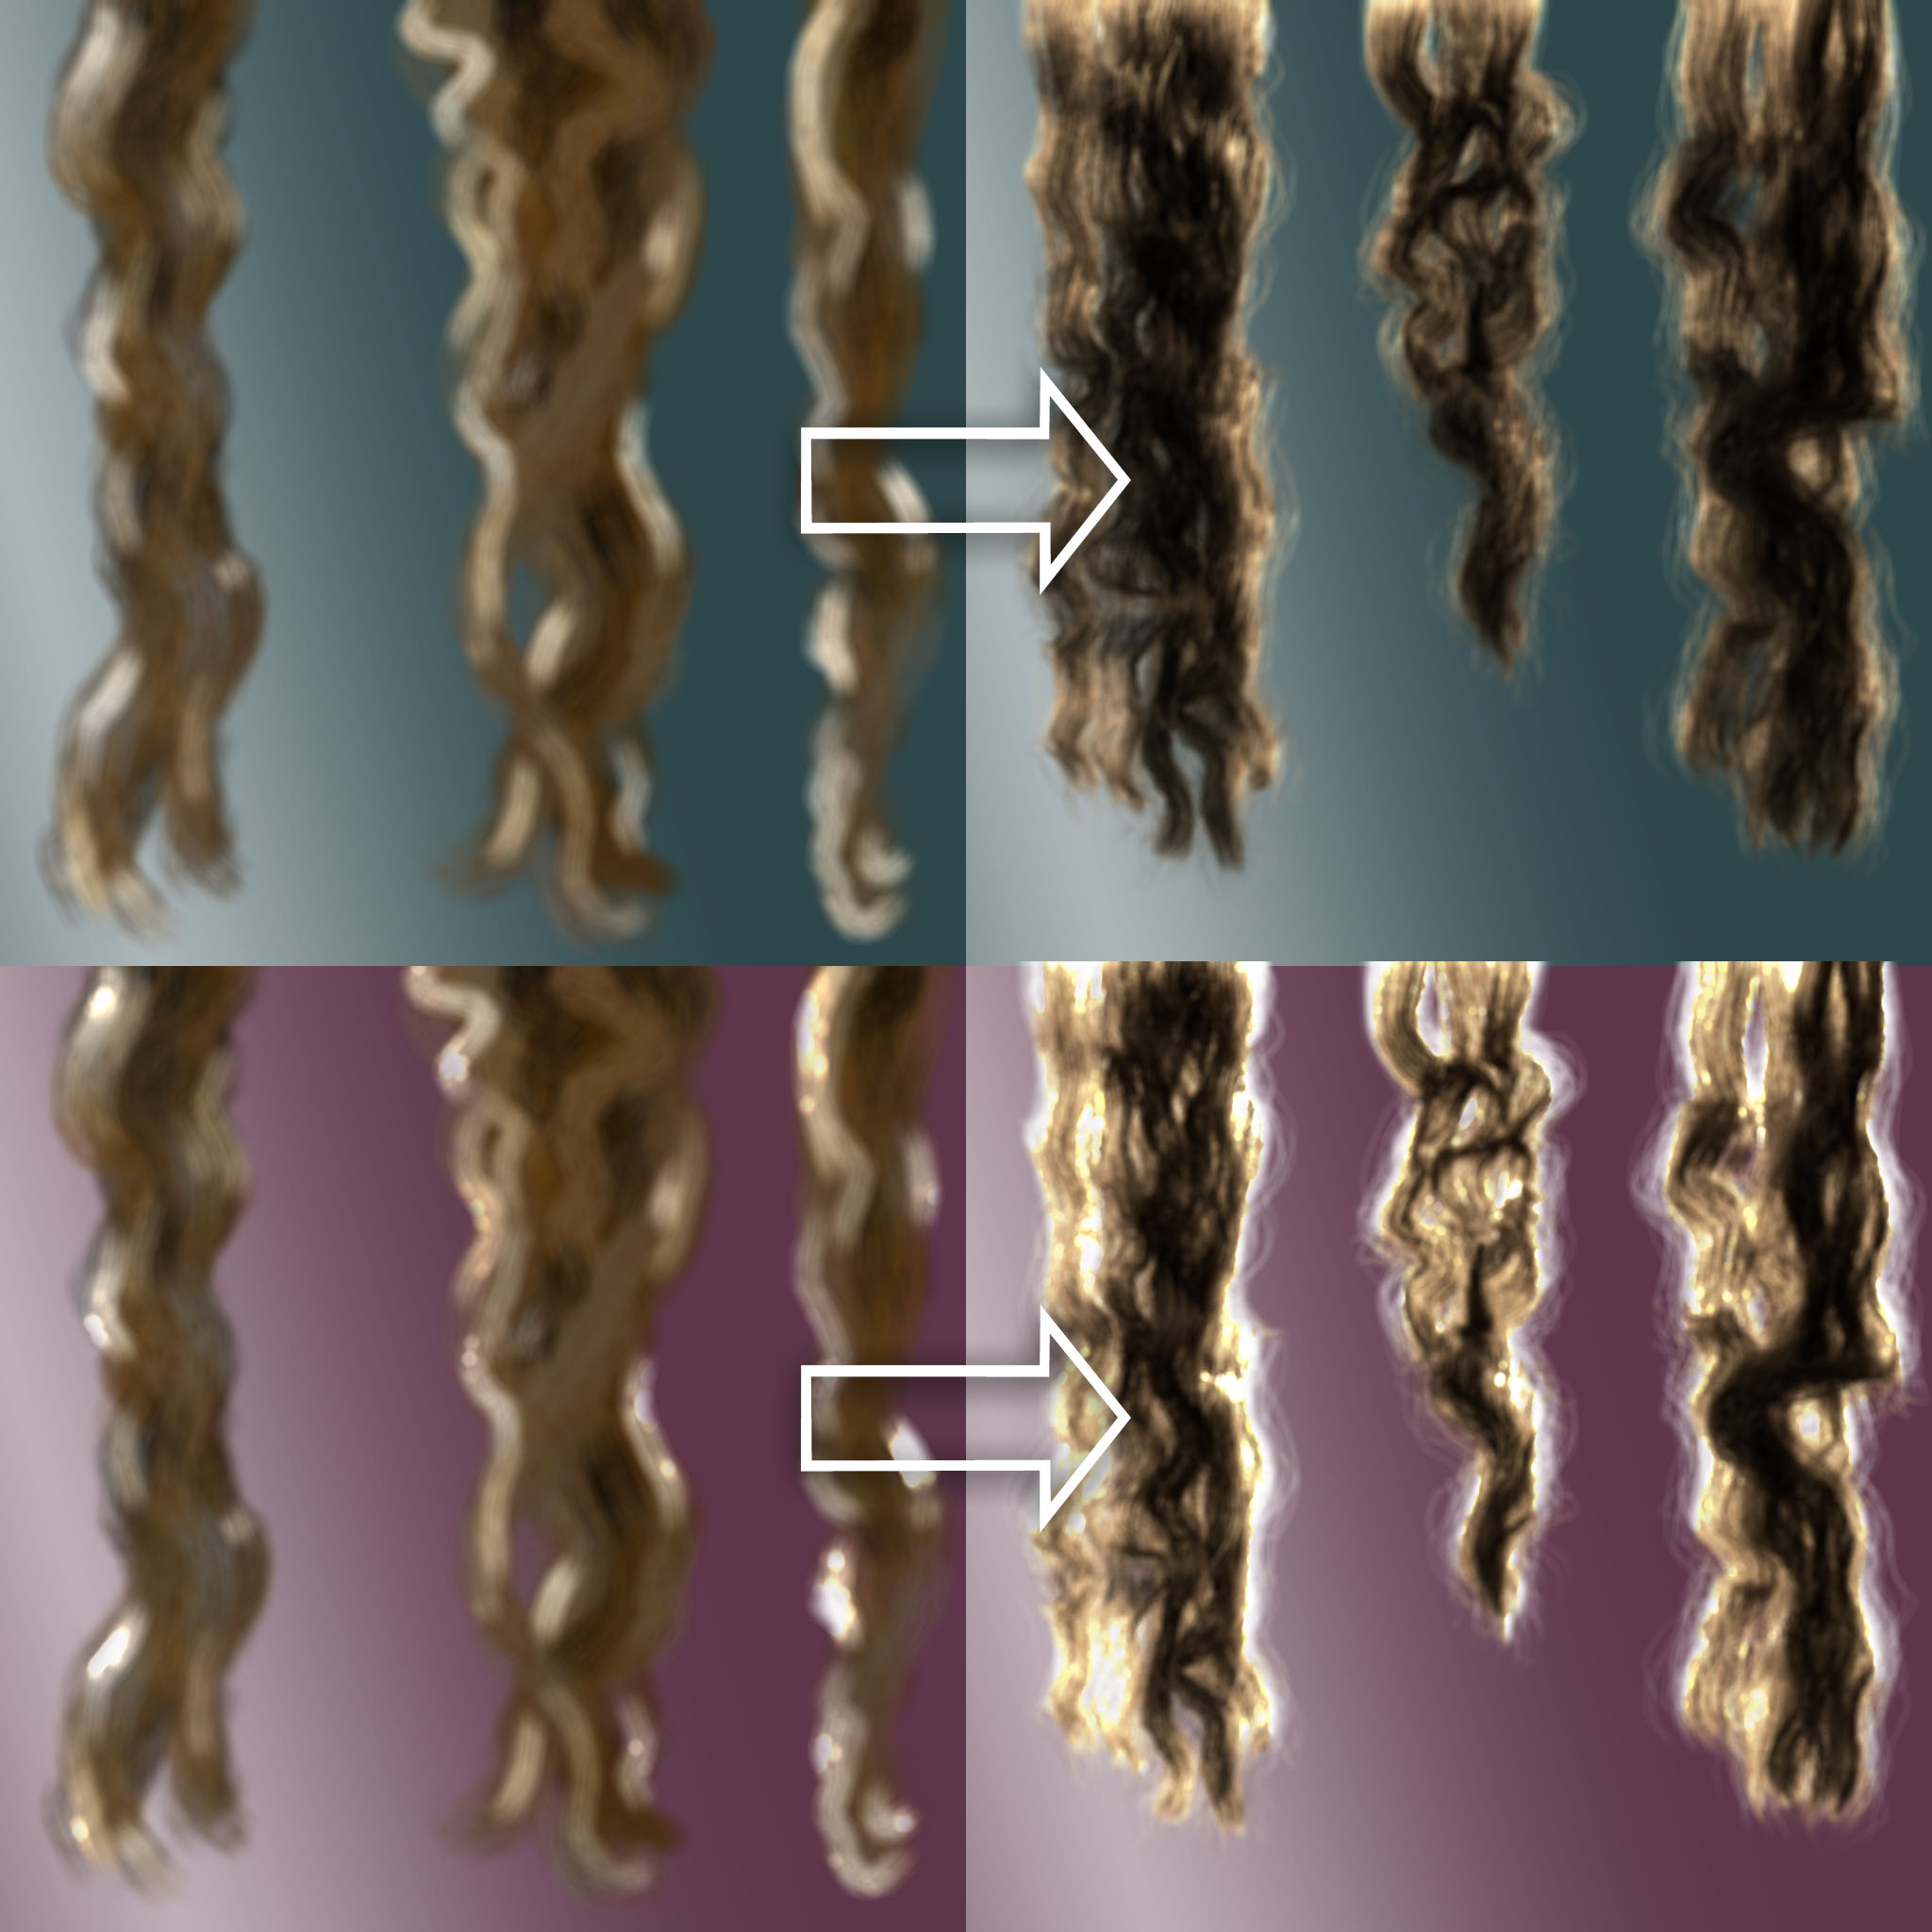
The Cycles renderer and Principled Hair (Transmissive) shader work together nicely. The tweaking options could use some love. (WTF does “shape” of a noise function mean?) Always use the BForArtists manual, not Blender’s.
“Lillie is the Keeper” 1.4 will bring many bigger improvements. We’ll look at those soon.
If you can name it, it’s not a monster.
VFX Graph is Unity’s high performance pure-GPU particle effects system. I recently helped Chop Chop Games get a sizzle reel out for an upcoming card battler, which involved a fair amount of prerendered particle work in Apple Motion and Blackmagic Fusion. Looking at their competitors in the space, like Slay the Spire and personal favorite Black Book, got me tinkering again with VFX Graph.
It’s an impressive set of tools, but shader experience is definitely a prerequisite. You need to “think in GPU.” One great decision was making Animation Curves a first-class citizen in VFX Graph, allowing for a lot of nuanced per-channel animation. Getting particle motion properly punchy is always a challenge.


You can download these all in a .unitypackage here. The download also includes a couple of potentially useful subgraphs. Point Force can be positive, to push particles away from a given point, or negative, to suck them in. Orbit can also be positive or negative, to control the direction particles orbit around a center point.
I spent a couple hours yesterday morning slapping these together as stand-ins for a sizzle reel. As soon as I’d dropped them into the motion graphics, the art department found their actual concept art. 😭
So, enjoy. Feel free to use these for whatever you need–personal, commercial, sexual.


LitK 1.2 is now available on the App Store. It features:
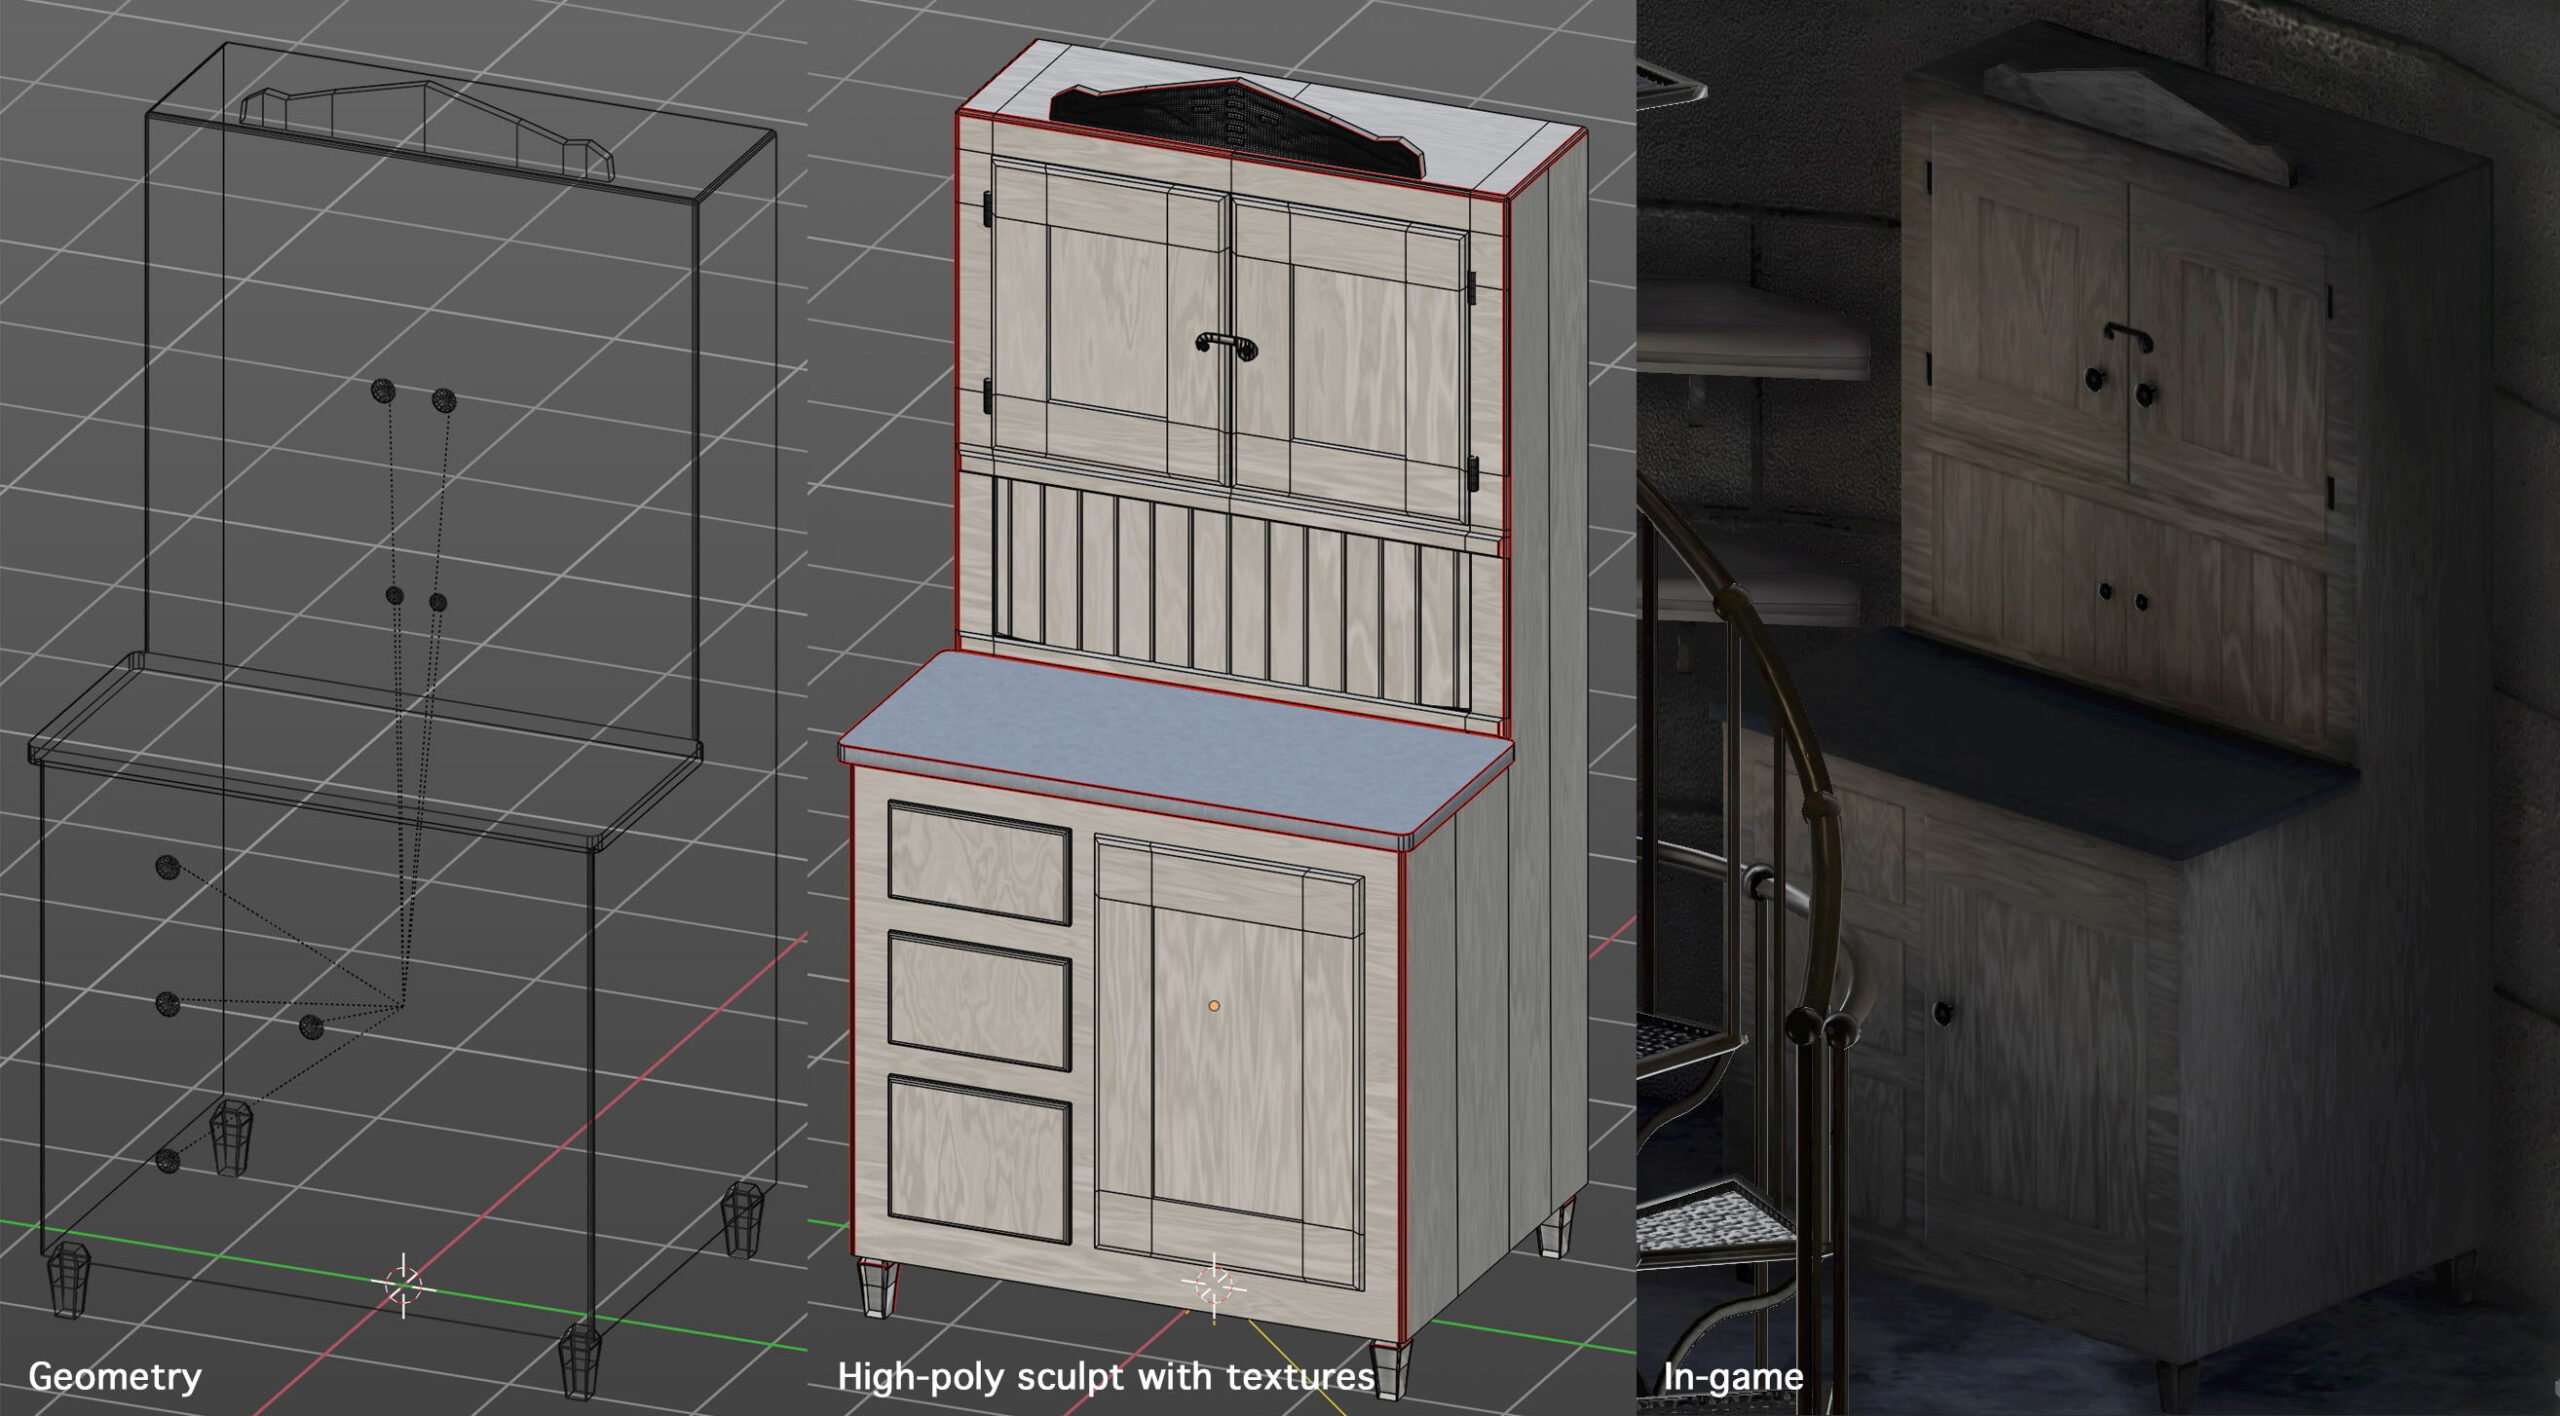
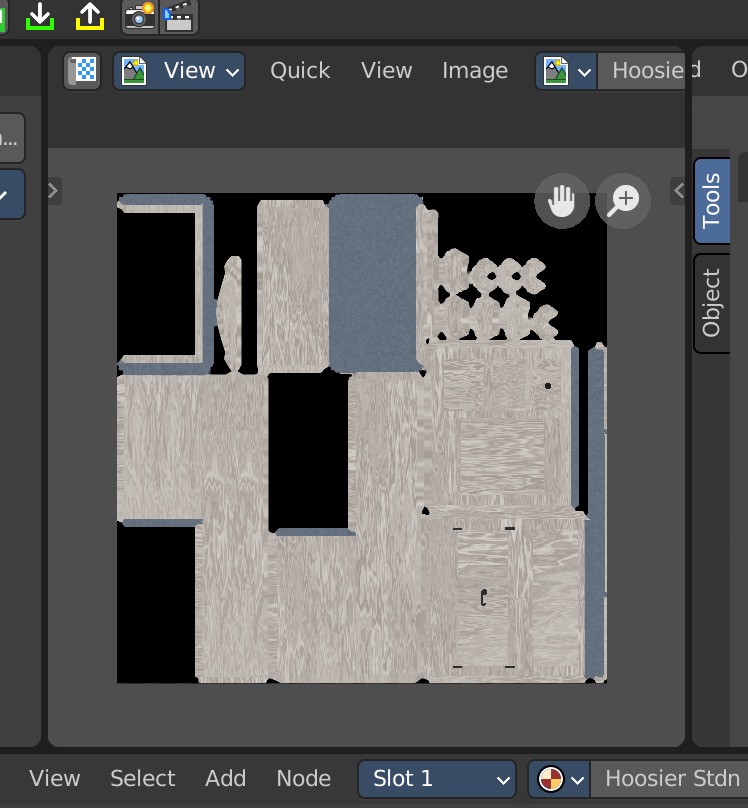
Unlike many tasks, Blender’s powerful but bafflingly-designed texture map baking tools are not improved by its UI-focused fork, Bforartists. Here’s how to use them, with a downloadable example (the Hoosier Cabinet from Lillie is the Keeper‘s upcoming 1.2 release). Click here to download the cabinet model with textures.
Honestly, if I haven’t done it for a while, I can’t remember how the process works, so this will be as much a cheat sheet for me as you.
Since it’s not our focus, we’ll skip quickly through the high-to-low-poly sculpt method. You create a low-polygon model, unwrap its UVs, and make a duplicate (using Duplicate Objects, not Duplicate Linked) in the same world position. Hiding the original, you sculpt a high-detail version, to be baked onto the original as (at minimum) a Normal Map. You can also use Bforartist’s Shading tab to create texture, displacement and color, even applying multiple materials to your high-resolution mesh. Since the UVs don’t have to match between the high and low-poly versions, effects like differently-oriented wood grain are just a matter of mucking with the high-poly sculpt’s UVs.
I’m also largely assuming you’re familiar with importing textures into Unity.
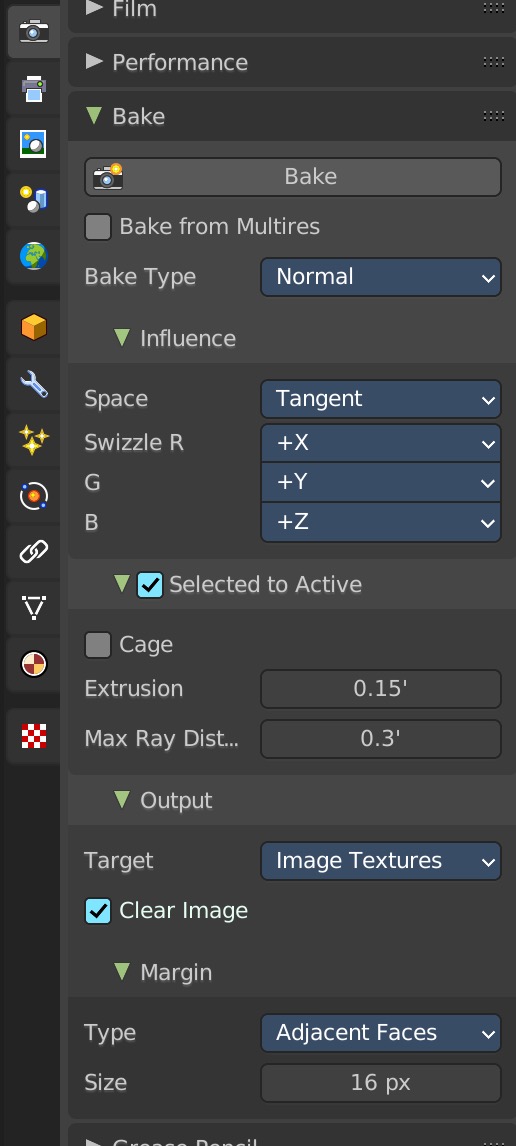
Ambient Occlusion darkens cracks and crannies in your surface. Most importantly, it keeps the inner edges of your Normal Maps from reflecting a bunch of weird phantom light.
It’s possible to bake Ambient Occlusion (as well as Diffuse and others) from a single model to itself–no high-poly needed. To do this, simply select the model, go to the Bake options and uncheck Selected to Active.
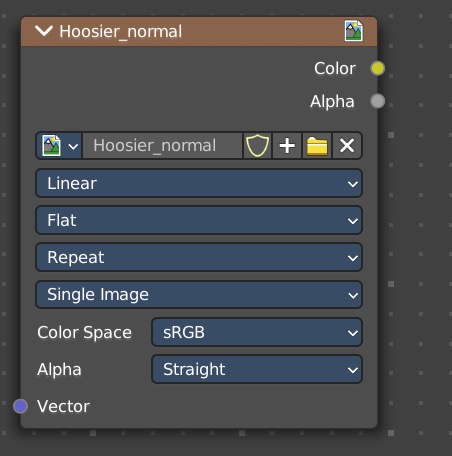
If you’re comfortable with the node-based shader system, and applying multiple materials to a mesh, you can do a lot of interesting texturing in Bforartists.
Typically, you’ll be baking Diffuse maps with a single model, rather than high-poly-to-low. Again, simply select the model, go to the Bake options and uncheck Selected to Active.

This one’s on Unity. In the Universal Render Pipeline (URP), there’s an awkwardly not-quite documented way to pack three monochromatic textures into one, saving two texture taps per draw (and textures in memory). The four channel (RGBA) texture packs a Metallic Map, Occlusion Map, an unused channel, and a Smoothness Map into one, I guess, “MOxS Map.”
With the first of the planned updates out, I’ve improved some of the visual elements that were just sort of roughed in for the initial release. (Because if you wait until everything’s perfect, you’ll never ship.) I wanted to share a little of my process.
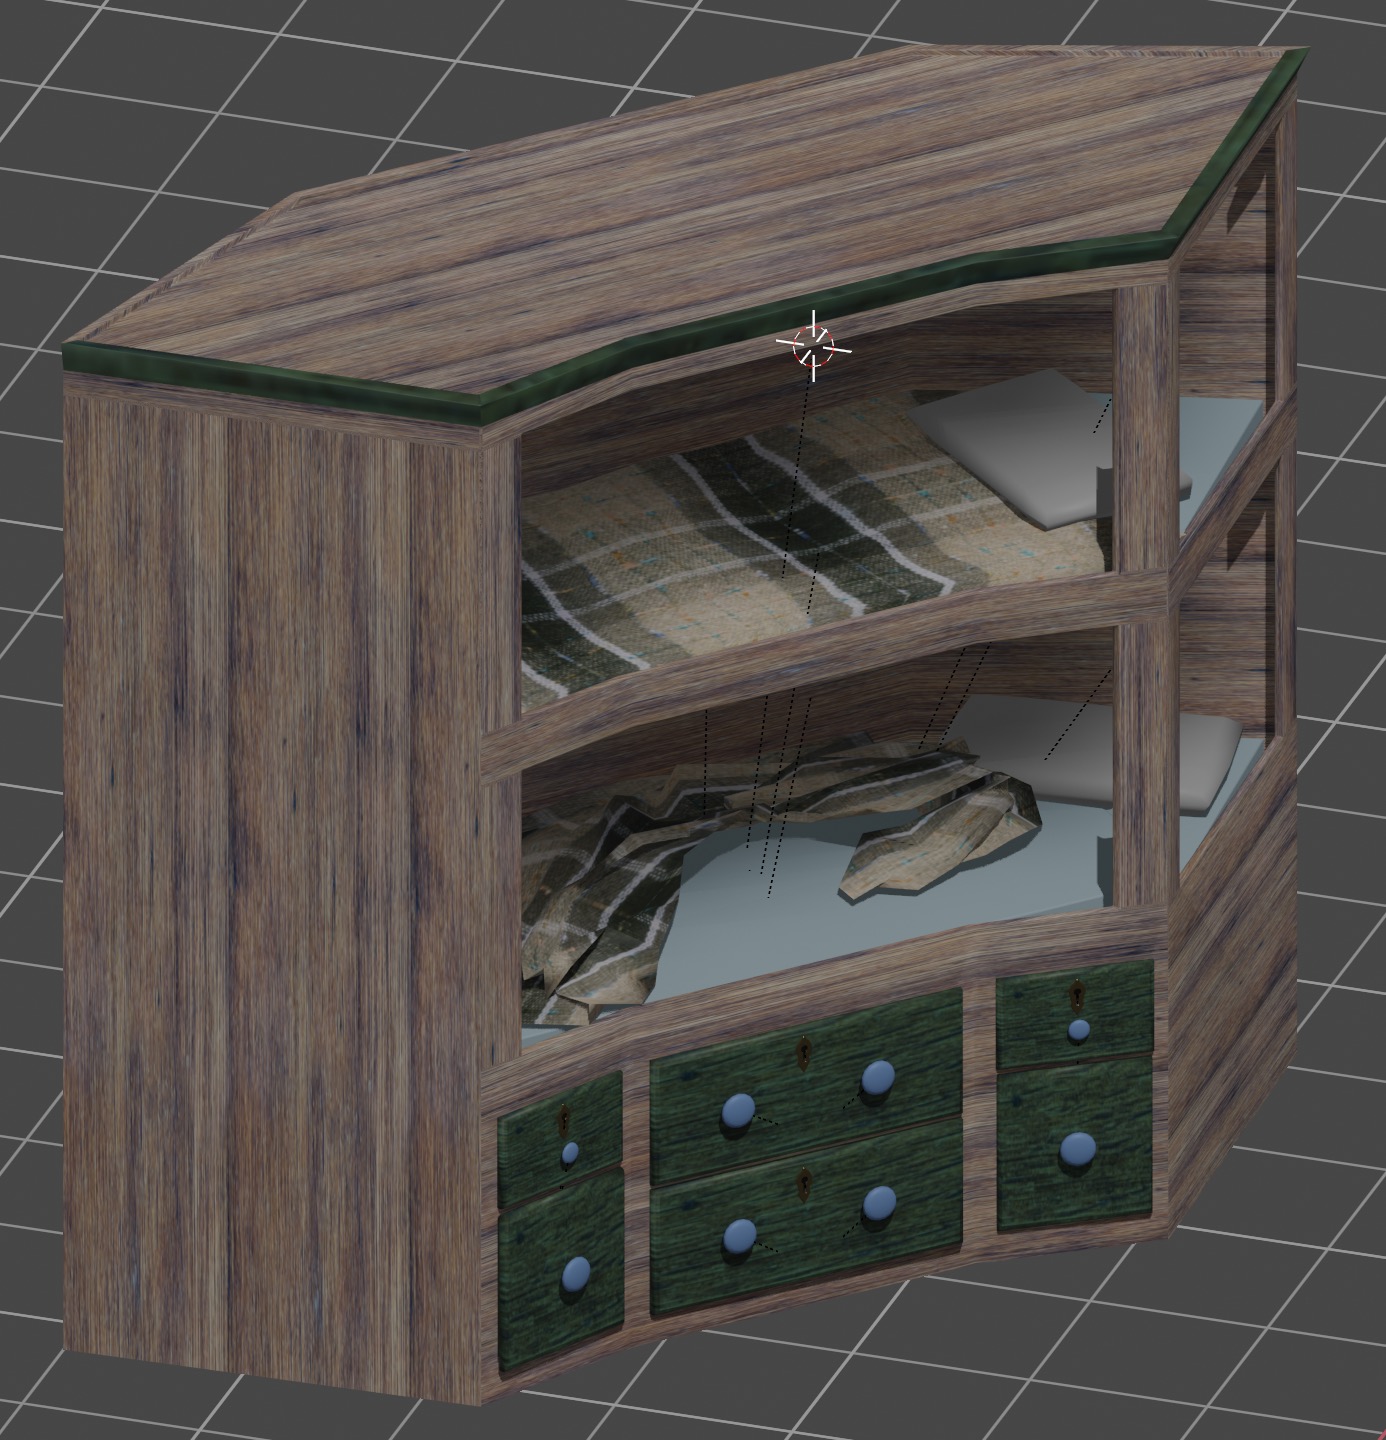
Here is the ZIP file. Everything is modelled in Bforartists, the UI-focused fork of Blender, and the file is 100% compatible with the mainline app. I use proxy Materials in Bforartists, as they’re easily replaced with native URP Materials in the .fbx file import dialogue. I find it more reliable to place unused/support items into a separate Scene Collection, and export the Active Collection from the .fbx export dialogue, rather than selecting items manually. Normally I do the bevelling by hand, but on the bunks I tried out the Bevel Modifier, followed by a light Decimate Modifier, to clean up unnecessary flat geometry. It works okay, and it’s quick, but the polygon count ends up higher than necessary. Because of the way Unity handles animations, the curtains are separate files.
The bunks are based loosely on photo references from the New Brighton Lighthouse. They’re meant to feel friendly and cozy, as they’re Lillie’s first sanctuary after the disastrous boat trip. In my head cannon (which I guess makes it the official cannon) we’re playing through Lillie’s memories, fears and anxieties. In “real life” she succeeded at all of these tasks the first time, but–like many of us–obsesses over what could have gone wrong. (Which are our in-game failures and resets.)
